Best Emergency Candles: Illuminate Your Path through Power Outages and Stormy NightsAuto Draft
Candles have long been the go-to source of light during emergencies, providing warmth, comfort, and illumination in the face of power outages and other unexpected situations. But not all emergency candles are created equal. In this article, we’ll explore the best emergency candles on the market, taking into account factors like burn time, safety features, and affordability.
- The Most Important Stuff
- 1. UCO 9-Hour Candles
- 2. Stonebriar Tall 3×6 Inch Unscented Pillar Candles
- 3. Sterno Emergency Candles
- 4. Beeswax Candles by Bluecorn Naturals
- 5. 115 Hour Plus Emergency Candles by CandleLife
- Best for Most: SDS Liquid Oil Candle
- Long Lasting: SE Survivor Series 36-Hour Emergency Candle
- Natural Candles: UCO 12-Hour Natural Beeswax Candles
- Lantern Accessory: UCO Candle Lantern
- Contenders
- How Many Candles Should You Have?
- Heating and Cooking with Candles
- Can You Make Your Own?
- Safety
- Candle Types
- Wick Materials
- Wax Types
- Value: Cost vs. Benefit
- Versatility
- How to Use an Emergency Candle
- Reusing Emergency Candles
- Tips for Using Emergency Candles
- Are Emergency Candles Even the Best Option?
- Conclusion
In cases of energy outages or natural disasters, survival candles become a vital illumination tool that lasts for prolonged periods. These survival candles provide a simple, cost-effective alternative to electrical devices or flashlights that require energy sources like electricity or batteries, and can be easily lit with a match or lighter.
Candles are typically made of wax, but they can also be made from other materials such as animal tallow or even liquids like olive oil. Regardless of the material, candles consist of a wick and a slow-burning fuel source that is ignited to produce light.
The Most Important Stuff
Burn time: Most emergency candles are designed to last between 20 to 115 hours, providing an extended light source during emergencies.
Storage temperature: Candles have a melting point between 140 to 180 degrees Fahrenheit (60 to 82 degrees Celsius). Therefore, it is important to avoid storing them in hot areas such as car trunks or attics, as excessive heat can cause them to melt.
Longevity: When stored properly, candles can last indefinitely. However, scented candles may lose their scent over time.
Preferred options: For home use, liquid paraffin candles are recommended as they are sealed, drip-free, burn clean, and can last for over 100 hours. Solid paraffin wax candles are common but tend to burn dirtier.
Portable options: When selecting candles for go-bags or similar purposes, opt for self-contained candles in metal tins or similar containers. Avoid glass containers as they add unnecessary weight and can break, posing a safety hazard in dark or emergency situations.
Freestanding candles: Choose candles that are freestanding and do not require additional pieces for support or foundation. Some candles are designed to be used within separate lanterns, for example.
Drip prevention: It is advisable to avoid candles that are prone to wax dripping outside of the container, as this can create a mess and potential fire hazard.
1. UCO 9-Hour Candles
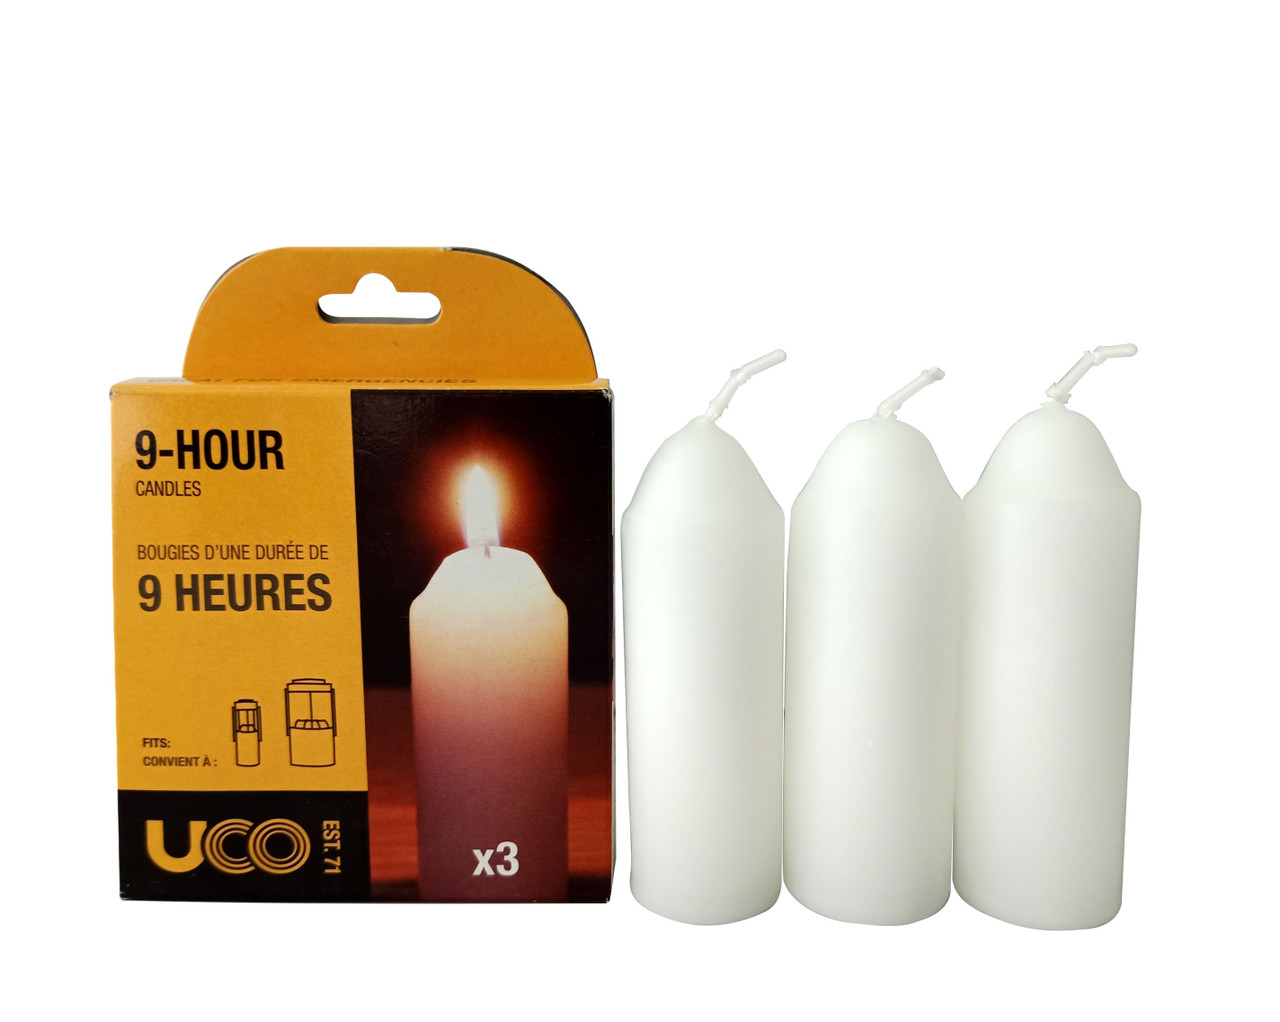
The UCO 9-hour candles are a top choice for emergency situations, offering a long burn time and a stable base for safe use. The candles come in a pack of three, each providing up to nine hours of burn time, making them a perfect addition to your emergency kit. They are compatible with the UCO Original Candle Lantern, which provides additional safety and convenience.
Price: $20.97
2. Stonebriar Tall 3×6 Inch Unscented Pillar Candles

Stonebriar’s 3×6 inch unscented pillar candles are another excellent option for emergency lighting. With a burn time of approximately 70 hours, they provide ample light during power outages. These candles are made of high-quality, smokeless paraffin wax, ensuring that they won’t produce irritating fumes. Additionally, their dripless design means they won’t create a mess during use.
Price: $24.98
3. Sterno Emergency Candles
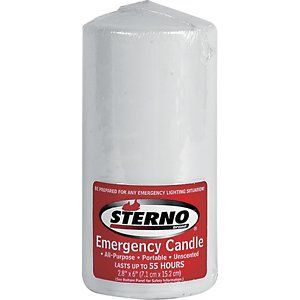
Sterno emergency candles come in a pack of six, providing up to 55 hours of burn time. These candles are specifically designed for emergency situations, featuring a wide, stable base to prevent tipping and spills. The wicks are designed to burn slowly and evenly, ensuring a consistent light source throughout their use.
Price: $37.98
4. Beeswax Candles by Bluecorn Naturals
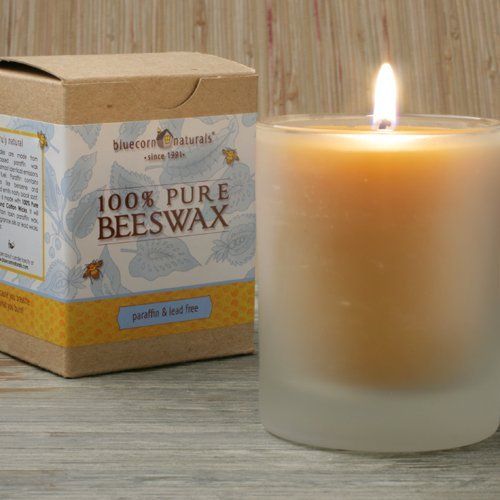
For those who prefer a more natural option, Bluecorn Naturals’ beeswax candles are a great choice. Beeswax burns cleaner than paraffin, producing less soot and smoke. These candles also emit a natural honey scent, making them a pleasant addition to any space. They offer a burn time of approximately 12 hours per inch and come in a variety of sizes to suit your needs.
Price: $27.79
5. 115 Hour Plus Emergency Candles by CandleLife

The CandleLife 115 Hour Plus emergency candles boast an impressive burn time, making them ideal for extended power outages. These candles come with a plastic holder and a metal cap to extinguish the flame, adding an extra layer of safety. Their unique design includes a liquid paraffin reservoir and a fiberglass wick, ensuring a consistent, long-lasting flame.
Price: $34.99
Best for Most: SDS Liquid Oil Candle
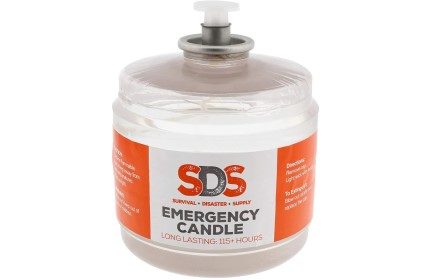
Candles, specifically those containing a substantial amount of liquid paraffin within a plastic container, are often perceived as the best selection for household emergency reserves. These types of candles have been rigorously tested and proven to exhibit minimal issues with leakage. The SDS candle, a representative of this kind, can deliver a burn time of approximately 115 hours. A consistent burning period of six hours daily would adequately cover the basic two-week readiness period.
Price: $20.97
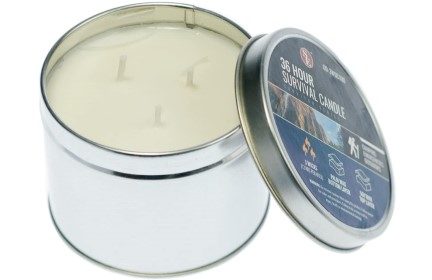
Long Lasting: SE Survivor Series 36-Hour Emergency Candle
Price: $17.95
Natural Beeswax: Candle Buzz Travel Tin
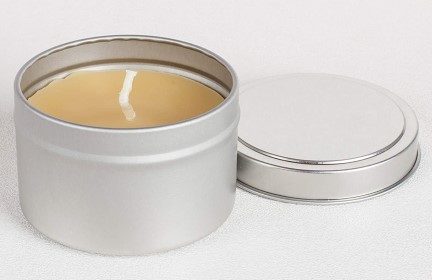
When it comes to storing candles in away-from-home emergency kits, using candles in metal tins is a practical choice. These tins offer durability and ensure that the wax remains contained. Additionally, the lid can be used to extinguish the flame quickly, allowing you to put it back in your bag without any hassle. The SE Survivor candle tin is designed with three wicks, providing the option to burn them one at a time for extended burn time or all three simultaneously for increased light and heat. Another appealing option is the Candle Buzz beeswax tin, which offers a natural alternative. Beeswax candles have various uses in the field, such as sealing leather and rust-proofing metal, making them a versatile choice.
Price: $32.99
Natural Candles: UCO 12-Hour Natural Beeswax Candles
Price: $19.99
Lantern Accessory: UCO Candle Lantern
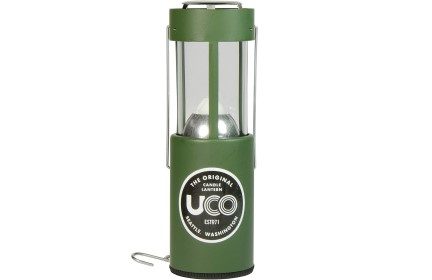
For those who prefer a more natural option, the UCO beeswax candles are an excellent choice. However, it’s important to note that these candles have a shorter burn time of 12 hours each. They can be conveniently placed on a tray or used in conjunction with the UCO Candle Lantern, which provides added protection and enhances the overall lighting experience.
Price: $19.99
Contenders
While they may not be among the top picks at the moment, the following candles are still decent options for emergency preparedness:
Bluecorn Beeswax 100% Raw Beeswax Pillar
Coghlan’s Candles, 5 Pack
Coghlan’s Tub Candles
Coghlans Emergency Candles — 2-pack with Metal Holders
Coghlan’s 36-Hour Survival Candle
Colonial Concepts 100-Hour Candle
Exotac CandleTin
Yartzeit 9-Day Candle – 2-pack Kosher Yahrtzeit Memorial and Yom Kippur Candle
How Many Candles Should You Have?
In the LDS Preparedness Manual article “Emergency Lighting,” authors Robert Roskind and Greg Pope suggest that every family should have a large supply of candles, even recommending a quantity of 365 candles, or one per day. While this may seem like a substantial amount, it may be too overwhelming for casual preppers.
If your goal is to cover the basics and be prepared for a two-week emergency, you can calculate the required number of candles. For instance, if a candle lasts 25 hours and you plan to use it for basic lighting needs for about 6 hours per day (from dusk until sleep), each candle would last for approximately 4 days.
Therefore, to cover a two-week period, you would need around 4 candles. This minimal approach would cost around $20-40 and suffice for the majority of emergency situations.
However, it’s important to consider additional factors such as multiple rooms, the need for heat to warm a shelter, and provisions for food and water. These considerations may require a larger quantity of candles or alternative lighting sources.
Heating and Cooking with Candles
While some preppers mention the possibility of heating and cooking with candles, it’s important to note that these options are not realistic or efficient. Using candles for heating or cooking can be compared to digging a latrine with a spoon – it can be done, but there are much better tools available.
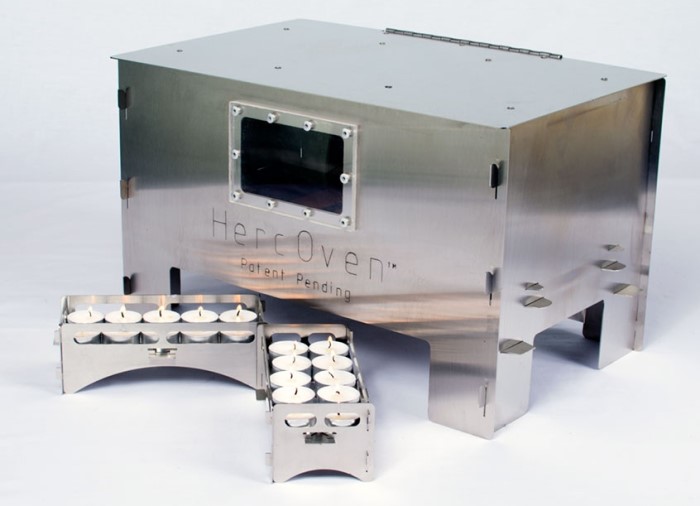
For example, the HERC ovens are designed to cook food using small tealight candles, but they can be quite expensive. Additionally, using tealight candles alone for cooking requires a significant number of candles and a specialized oven.
Candles generally do not generate a significant amount of heat. In “The SAS Survival Handbook,” John Wiseman mentions that a candle can raise the temperature inside an igloo by only four degrees. While this might be useful in raising the temperature above freezing in a tent as a last resort, it is not an ideal solution.
Various plans can be found online for constructing candle heaters using clay pots with a metal core or a series of metal cans. While it may be handy to know how to make these heaters, there are better preparations to invest in for keeping oneself warm during emergencies.
Similarly, when it comes to cooking, candles are not the most efficient option. For example, a three-candle burner built according to an Instructable can heat a can of soup in 15 minutes or boil water in 45 minutes. In comparison, a Jetboil or an inexpensive pocket stove can boil water in about three minutes.
When it comes to heating and cooking, it is generally more practical to use a candle to start a larger fire or rely on more efficient and purpose-built tools for these tasks.
Can You Make Your Own?
In emergency situations, there are several alternative methods to create makeshift candles. Here are a few examples:
- One method involves turning an orange into a candle by carefully separating the meat from the rind, filling half of the rind with oil, and lighting the pith. While it can work, it is a delicate and potentially impractical approach.
- A simpler option is to use a floating wick placed in a jar of oil. Companies like Kevin’s Kandles offer floating wicks specifically designed for this purpose.
- Another option is to create edible tallow candles by dipping a wick or twine in melted tallow, allowing it to harden, and repeating the process. For added variety, herbs and other flavorings can be incorporated into the tallow.
- Crisco, a brand of vegetable shortening, can also be used to make a candle. One approach is to either insert a wick into a hole created in the Crisco using a chopstick or to scoop the Crisco into a container and insert a wick. It’s important to note that the Crisco used in a candle should not be consumed.
- Crayons can be melted and repurposed to create candles.
Safety
It’s important to acknowledge the potential risks associated with candles as they can be a leading cause of house fires. According to the National Fire Protection Association’s data specific to the United States, here are some noteworthy facts about candle-related incidents:
- Between 2014 and 2018, over 7,600 house fires were caused by candles.
- On average, 21 home candle fires are reported each day.
- Candles account for 2% of all home fires and contribute to 6% of home fire injuries.
To ensure safety when using candles, it’s crucial to keep the following tips in mind:
- If your candles are not self-contained, it’s advisable to have a flame-proof layer in place to catch any wax drippings. Using aluminum foil can serve as a quick solution.
- Avoid using candles after an earthquake, as gas lines may be damaged, or around any potential sources of gas.
- Refrain from using candles in homes where oxygen tanks are in use.
- Maintain a minimum distance of 12 inches between candles and any flammable materials.
- Exercise caution by keeping candles out of the reach of children and pets, ensuring they are placed on a stable surface, and never leaving them unattended, especially when going to sleep.
- It’s also important to have a fire extinguisher readily available in case of emergencies.
Candle Types
There are various common forms of candles available, each with its own characteristics and suitability for different purposes:
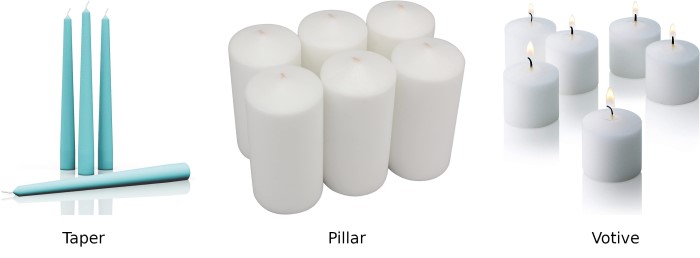
Taper: These are long, thin candles that gradually narrow towards the ends.
Pillar: Thick candles that are designed to stand on their own without the need for a holder.
Votive: Short candles specifically intended to be placed inside a container.
Container: Candles that are designed to always remain in a container, such as glass or a metal tin.
Tealight: Small candles that come housed in a metal or plastic case.
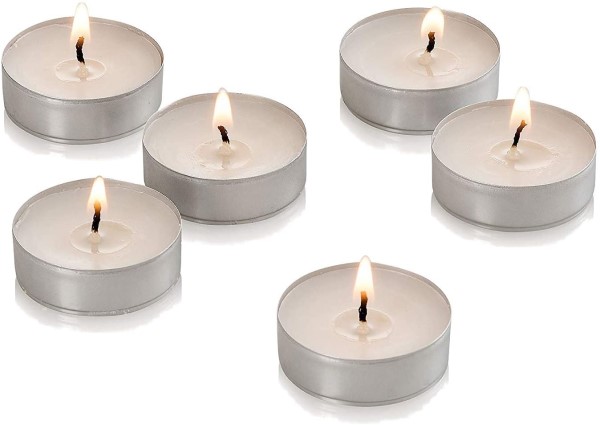
When considering preparedness, it’s important to choose candles that can stand on their own or are housed in a metal tin. Pillar candles and tealight candles are particularly suitable options. The use of candles in a metal tin is highly recommended for go-bags, as it minimizes the risk of melted wax causing a mess inside your bag.
Wick Materials
While there are various types of candle wicks available, the options may be limited when purchasing pre-made candles, and the material used in the wick may not always be disclosed by the vendor.
It’s worth noting that some candle wicks used to contain lead cores, but most manufacturers in developed countries stopped using them in the 1970s. While the actual hazard of lead in wicks remains uncertain, if you have concerns, it is advisable to purchase candles manufactured in developed countries. A simple test to check for lead in a wick is to rub it over a piece of paper. If it leaves a gray mark similar to a pencil, it likely contains lead.
Here are some common types of wicks:
- Zinc-cored: These wicks have a metal wire incorporated to provide stability during construction and while burning.
- Paper-cored: These wicks burn at high temperatures and may not be ideal for survival situations.
- Flat braid: These are often found in inexpensive candles. They curl while burning to minimize smoke and ensure even burning.
- Square braid: These are sturdier versions of flat braided wicks, typically preferred by beeswax candle makers and survivalists.
- Floating: These wicks are simply placed in oil to create a floating candle.
However, unless you engage in candle-making, the type of wick used is mostly trivial information when purchasing pre-made candles.
Wax Types
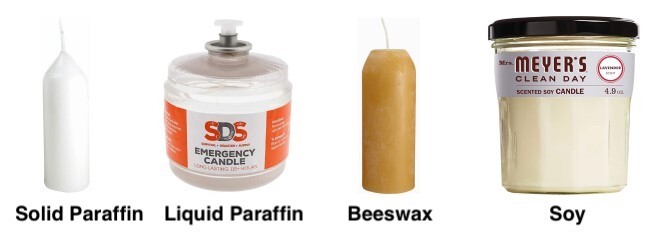
When it comes to choosing the wax for your candles, you may have more options available than with the choice of wicks. Here are some common wax options to consider:
Solid paraffin: Solid paraffin is the most common type of candle wax and is derived from gasoline production. However, it is considered an inferior wax due to the emission of irritating fumes and soot. It also doesn’t last as long as other types of wax.
Liquid paraffin: On the other hand, liquid paraffin candles are a different story. They are typically self-contained, do not produce smoke, and have a long burn time.
Soy: Soy candles are often considered a more “natural” alternative to paraffin. While they may be blended with other waxes, soy candles are known to burn longer than paraffin. They are usually found in container form due to the softness of soy wax.
Beeswax: Beeswax is another option that is less toxic than paraffin. It is often praised for its longer burn time compared to paraffin. Additionally, melted beeswax can be utilized for various purposes such as rust-proofing steel and treating leather.
Tallow: Tallow candles are frequently recommended in survival manuals for their extended burn time and the fact that they can be consumed in emergency situations. However, they are challenging to find commercially.
Some candles may also be infused with citronella, believed to repel mosquitoes and other insects. However, the effectiveness of citronella-infused candles in this regard is more of a myth than a proven fact.
It is important to consider the melt temperatures of different wax types to ensure they do not melt excessively during storage. Melt points vary among waxes, ranging from around 113F (for certain soy waxes) to 180F (for palm wax). Soy and paraffin typically have lower melt points, while beeswax falls on the higher end of natural waxes at 144-149F. It’s advisable to consult with the candle manufacturer to determine the specific melt temperature for the wax you choose.
Value: Cost vs. Benefit
As previously mentioned, there is a wide array of inexpensive candles available, particularly those that are decorative or scented. Even if you possess a surplus of candles that may not be ideal, they can still prove useful during emergencies. However, it is advisable to include candles in your emergency kit that offer the best value for your investment.
Our primary recommendation prioritizes value above all else, while the alternative options of tea candles and liquid paraffin excel in their respective roles while offering excellent value for money.
It’s essential not to overspend on any single resource, including candles. Opting for functionality and versatility while making the most of your survival kit investment is the prudent approach. Our top pick falls within the optimal range, providing a combination of high value, optimal functionality, and a reasonable price.
Versatility
Certain candles, such as tea lights or liquid paraffin survival candles, are conveniently housed in containers, providing increased durability and a reduced likelihood of breaking apart (in most cases). Our top pick includes a candle lantern specifically designed to complement these candles, making them highly suitable for on-the-go usage.
While refillable options offer some added versatility, they are predominantly limited to liquid fuel candles, unless you plan on handcrafting your own wicks and engaging in wax-dipping to create more solid wax candles. This process may not strictly fall under the category of refilling but can be considered as an alternative if you have the necessary resources.
Candles offer a multitude of applications, which contributes to their overall versatility.
How to Use an Emergency Candle
Candles offer a straightforward usage, yet their versatility is surprisingly extensive. Position the candle in a location where it is unobtrusive but can illuminate work areas, traffic areas, or living spaces effectively during emergencies. When it comes to room lighting, brighter burning candles, such as our recommended top pick, are preferable, while tea lights suffice for providing visibility in the dark.
Ignite the candle using any matches you have readily available. While we can suggest the best stormproof matches, if you are setting up candles indoors, you can simply utilize the matches or lighters you already possess.
Quick Tip: Enhance the efficiency of the candle’s light output by placing a mirror or foil behind and/or beneath it to reflect light.
Ensure that flammable materials like drapes, paper, maps, or other combustible furnishings or supplies are kept at a safe distance from the candles. Additionally, ensure that the candles are positioned on a sturdy surface where they are unlikely to be knocked over or disturbed.
Reusing Emergency Candles
Preparing Used Wax
Begin by evaluating the quantity of wax you have on hand. If you have enough wax to fill a bowl or coffee can to a depth of 6 inches, you may opt to dip your candles. However, if you have a smaller amount of wax or prefer a simpler approach, pouring candles into a container is recommended.
Take a large pan and fill it with approximately 1 inch of water. Heat the pan until it reaches a simmering temperature.
Place a saucepan, metal bowl, or coffee can inside the larger pan. Add your used candles, ensuring that you do not mix different types of wax, such as beeswax, paraffin, and soy wax. It is safe to combine two candles made from the same type of wax, even if they vary in color or fragrance.
Attach a candy thermometer to the side of the pan, making sure the sensing end is immersed in the wax. Once the temperature reaches 185 degrees Fahrenheit, your wax is ready to be utilized.
Using a spoon or fork, skim off any charred bits, unused wick, or other debris from the melted wax.
If you desire a pleasant scent for your candles, you can add 1/2 to 1 ounce of an essential oil, such as geranium oil. Stir the mixture thoroughly before proceeding.
Pouring Candles
Clean and dry a glass or ceramic container, such as a shot glass or teacup.
Cut a piece of string or wicking so it is at least 2 inches more than the height of your container. Wrap your wick around a spoon or fork. Dip it into the wax briefly to coat it.
Place the utensil across the top of your container, so the wick hangs down into the container’s center. Adjust so the wick just touches the bottom of the container.
Pour a small amount of wax into the bottom of the container, and then adjust the wick so it stays in the center. Repeat, filling the container to about 1/4 inch below the rim.
Let stand for about an hour to set, and then cut the wick so about 1/4 inch sticks out from the top of your new candle.
Dipping Candles
Make sure your melted wax is in a deep, slender container. Ideally, your dipping wax should be at least 6 inches deep.
String a clothesline or place a broom handle across two chair backs or other steady supports. This is where you will hang dipped candles to dry.
Cut your string or wicking to a length of at least 16 inches. Tie a fishing weight, metal nut or a few pennies to each end.
Hold the string in the center, and dip both ends into the wax to your desired candle length. Remove and let cool for four seconds.
Repeat this process, making sure your candles cool for several seconds between dipping, until the candles reach your desired size.
Hang the candles on your line or broom handle, making sure they don’t touch. Let them stand for a full day, and then cut off the weights from the ends and trim the wick to about 1/4 inch.
After Completion
The first time you light your new candle, let the wick burn for two hours. This will make it easier to light the next time.
Different types of wax have different melting points. Pay attention to your wax when you’re melting it: If it starts to smoke, it is too hot. You may need to lower the temperature to 165 degrees F for better results.
Tips for Using Emergency Candles
Enhance the brightness of candles by placing them in front of a mirror, as it will effectively reflect the light they emit.
Instead of carrying candles around the house, it is advisable to utilize a headlamp for convenient lighting.
If you have pets, it is recommended to avoid using candles altogether or ensure that the room where the candles are located is inaccessible to them.
Take caution when using tea lights as they can become hot. Pay attention to the surface on which they are placed to prevent any potential hazards.
Prevent the hassle of cleaning up melted wax by always placing something underneath your candle to catch any drips or spills.
Exercise caution when using candles. While I understand you are not careless, it is important to note that many fires are caused by unattended candles each year. Therefore, only burn candles when they are within sight, and ensure they are positioned in a way that minimizes the risk of being knocked over.
Are Emergency Candles Even the Best Option?
During my childhood, candles were the go-to solution for emergency lighting. This was primarily due to the high cost of flashlight batteries and the limited availability of rechargeable ones. Solar-powered flashlights were not yet commonplace back then.
Nowadays, we have a plethora of alternative options for emergency lighting. Some of these options, along with their corresponding Amazon links, include:
- Flashlights
- Headlamps
- Oil lamps
- LED lamps
- Glow sticks
- Propane lamps
It is crucial to acknowledge that candles pose a significant fire hazard, making them unsuitable for certain situations. For example, after an earthquake or when there is a risk of gas main breakages, candles should never be used.
However, candles do offer some benefits that make them a viable choice. First and foremost, they are cost-effective. Additionally, candles have the ability to generate heat, which can be life-saving in situations where alternative heating options are not available.
Pros of Using Emergency Candles
✔ Affordable: Emergency candles are inexpensive to purchase, making them a budget-friendly option.
✔ Reusable Wax: The wax from candles can be reused, providing an opportunity for sustainability and resourcefulness (more details on this later).
✔ Heat Production: Candles can generate heat, which can be beneficial for warming up a room or providing localized warmth in emergency situations.
✔ DIY Potential: It is possible to create your own emergency candles, allowing for customization and self-sufficiency.
✔ Battery-Free Operation: Unlike many other emergency lighting options, candles do not require batteries or external power sources to operate.
✔ Protection from EMP Events: Candles are not affected by electromagnetic pulses (EMPs), ensuring they remain functional during such events.
Cons of Using Emergency Candles
❌ Unsuitable after Gas Main Breaks: Candles should never be used if there is a possibility of a gas main break, particularly in the aftermath of earthquakes or similar situations.
❌ Fire Hazard: There is a risk of candles tipping over and causing fires, emphasizing the need for caution when using them.
❌ Flickering Annoyance: The flickering flame of candles may be perceived as bothersome by some individuals.
❌ Insufficient Lighting: To achieve adequate lighting for specific tasks, a substantial number of candles may be required, potentially making them less practical for certain situations.
Conclusion
When selecting the best emergency candles, it’s essential to consider factors such as burn time, safety features, and the type of wax used. The UCO 9-Hour Candles, Stonebriar Tall 3×6 Inch Unscented Pillar Candles, Sterno Emergency Candles, Beeswax Candles by Bluecorn Naturals, and 115 Hour Plus Emergency Candles by CandleLife are all excellent options to keep you prepared for any emergency. By adding these candles to your emergency kit, you’ll ensure that you have a reliable source of light during power outages and other unforeseen circumstances.